Friday, December 28, 2012

Working With IrfanView


Introduction

IrfanView is a “freeware” computer program designed to process multiple image files in large batches. While it lacks the photo editing and manipulation capabilities of programs such as Adobe’s ® PhotoShop®, it performs admirably as an assistant to those programs.

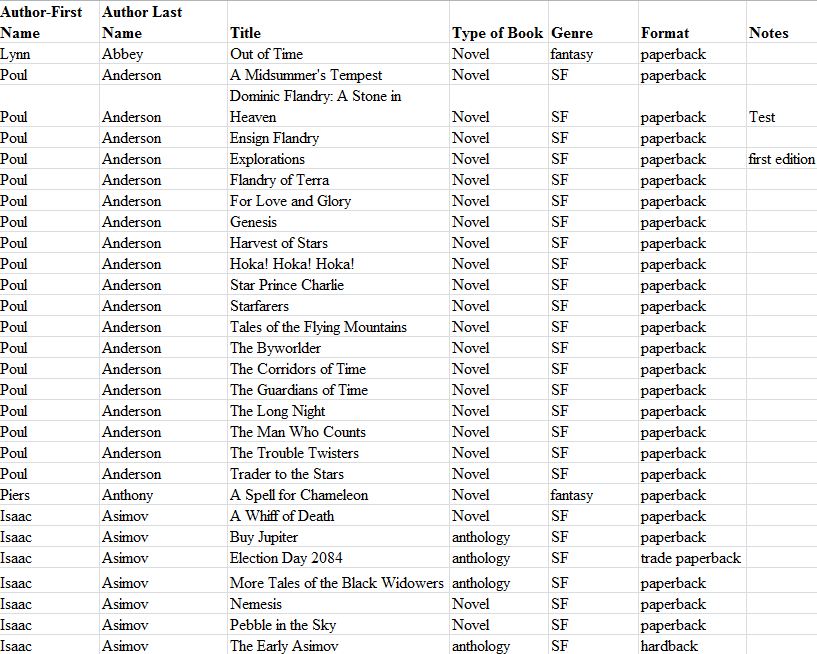
Image 1: IrfanView’s opening screen for Batch Conversions after a folder of images is selected.

When you open IrfanView for the first time, your first task is to go to the “Batch Rename settings name pattern:” and insert $N.jpg. This command ensures that every image retains its original name followed by the lowercase .jpg extension, which can save you a lot of time
Your batch options are: “Batch conversion,” which alters each image in any of several forms; “Batch rename,” which changes the file name; and “Batch conversion- rename result files,” which does both.
If all of you images are already in .jpg format, select “Batch Conversion.” If not, select “Batch conversion- rename result files.”
IrfanView retains these settings until you decide to change them.

Resizing Images

One of IrfanView’s advantages over PhotoShop ®is its ease of resizing photos. This is especially important when processing large batches of images for use in on-line product catalogs.
PhotoShop ® requires creating a macro to perform batch resizes, and then only on identically-oriented (all vertical or all horizontal) images. IrfanView lets you apply one measurement to the longest or shortest side.
IrfanView will automatically crop the borders and allow to perform many other functions on batches of images.

Image 2: IrfanView’s Advanced Options dialog box.

A suggested way of working with groups of photos is creating at least one Output folder as a nested sub-folder of the folder where your images are stored. Have your adjusted images saved to the new location. This way your originals are not overwritten should a problem occur.

Using PhotoShop and IrfanView Sequentially

Many photographers prefer to shoot their images at the maximum resolution available then “dumb down” copies for other purposes such as displaying them online. Using PhotoShop® first then IrfanView makes a lot of sense and saves a lot of time and frustration.
Consider this method, which assumes your original images come in a Raw format, which retains all of the shooting information and lets you alter the exposure after the fact.
Let’s start with a possible scenario: your firm has 50 new products it wants to sell on its website and promote in both print and online ads. You need to have three copies of each photo:
1.      Maximum quality images for print advertising. These should be 240-300 dots per inch (dpi) or greater for the best results.
2.      Smaller versions designed for the Internet that are still fairly large both for executives to pick from and for use with blogs. A size of 4 inches by 6 inches at 72 dpi (screen resolution) is a good starting point.
3.      Even smaller images for use in your online catalog, such as with a maximum size of 1200 pixels on the longest side.
First, run your images individually through PhotoShop making adjustments to the exposure, color balance, contrast, brightness and color intensity, then save the adjusted versions as .jpg images at maximum (100 percent) resolution. Keep these images in a folder separate from the Raw files just as a precaution.
Remember, jpgs compress image files, causing a reduction in information and therefore a drop in clarity every time the image size is changed. Having an unaltered original means that you can always go back to the original.
Once adjusted, these first-level images can be printed up the maximum size, such as 11-inches by 17 inches or even larger, depending on the settings and capabilities available, of the camera used.
The result of your first round is a group of jpgs, some with the lowercase .jpg extension and possibly others with upper case JPG or mixed-cased Jpg extensions. Why does it matter? Because some ecommerce platforms such as Magento will only accept images with the lowercase extension.
You just completed your first task.
Once your first round of jpgs are ready, close PhotoShop® and open Windows Explorer (not the Internet Explorer web browser). Create two nested subfolders labeled Output1 and Output 2.
Using the dialog box shown above, click the “Resize” box (Image 2, above) and select 6 then inches as the longest size and put 72 in the “Set new DPI value.”
Now go to the Basic dialog box (Image 1) and select Output1 as the “Output directory for results” folder.
In the interest of ensuring all images have the lowercase .jpg extension and the original filename, place “$n.jpg” (no quotes) in the “Batch rename” “Name Pattern” box.
Select “Add All” images from the basic choices then “Run Batch.” IrfanView will quickly process all images and place them in Output1 while leaving your original Raw and first-round jpgs alone.
Task 2 is now complete.
Now go select Output1 as your starting point and Output2 as the end point for Task 3. This time, go into the Advanced Settings Dialog Box and click the Resize Image box then select an appropriate size for your online catalog shots, such as 1200 pixels at 72 dpi.

Image 3: The JPEG/GIF “Save Options” Dialog box.
You can also reduce the file size further by dropping the image quality set in the JPEG/GIF Save Options Dialog Box from 100 percent, which is where it should be set initially. Consider a setting of about 50 percent for images that only appear online.

Now For the Results


Image 4: The T-Rex skeleton at the California Academy of Sciences, San Francisco. (Size reduced to fit space limitations) after the first pass through IrfanView. There is no noticeable drop in image quality.


Image 5: The T-Rex skeleton and a blue jellyfish at the California Academy of Sciences, San Francisco. Size reduced to fit space limitations after the second pass through IrfanView. Image quality is degraded, though this is not typically a problem with static products such as clothing.

Summary

IrfanView is not designed to replace Adobe’s PhotoShop as a photo editor. However, it is a good compliment to PhotoShop. IrfanView makes applying repetitive alterations, such as changing sizes and resolutions, a quick and easy process.


Sunday, December 2, 2012

Using a mouse is much less efficient than using keyboard shortcuts.

Introduction

Keyboard shortcuts save an immense amount of time because your fingers never leave the keys. You are not constantly clicking on a menu nor moving your mouse several times as you select from a series of drop-down menus.
These are a few of the most commonly used keyboard shortcuts in Microsoft Windows and Microsoft Office programs.
Shortcuts 
Ctrl+W: Close Windows
Alt+Tab: Switch between programs
Ctrl+Tab: Switch between tabs or windows in the same program
Crtl+C: Copy
Crtl+F: Opens the Find dialog in MS Office programs
Crtl+H: Opens the Find and Replace dialog in MS Office programs
Ctrl+N: New document
Ctrl+S: Save
Crtl+P: Print
Crtl+X: Cut
Crtl+V: Paste at cursor location
Crtl+Z: Undo one action
Alt+F+A: Save As
F1: Calls up context sensitive help
F7: Spellcheck document (Microsoft Office programs)
Shift+F7: Activates Thesaurus in Microsoft Word
F12: Save As (Microsoft Office programs)
Windows key+E: Opens Windows Explorer
Windows Key+D: Returns users to the Desktop

To save an Excel document in CSV (comma separated values) files instead of an Excel XLS (older versions of Excel) or XLSX (Excel 2010) follow these steps.
1.      Tap the F12 key to open the “Save As” dialog box
2.      Press the Tab key to go to the “Save As Type” dropdown box
3.      Press C to select the CSV option
4.      Press Enter to make your selection

Online Catalogs Require Planning, Attention to Detail


Online catalogs help drive sales.

Introduction

Having an online catalog is critical to the financial success of any sales-oriented firm, whether that firm operates on a retail “bricks and mortar” store, only an online ecommerce site, or a combination of both. Creating an online catalog requires research, writing and design, search engine optimization and a detailed database. When done properly, good online catalogs let your customers shop any time of the day or night. They also provide much more information—at a substantially lower cost—than a printed version.
On-line catalogs are costly in one major respect: they require a lot of material be manually inputted into a computer system.
Let’s take a look at each element starting with research.

Research

Researching items for an online catalog means pouring through other online resources, such as those from your suppliers, and/or printed product descriptions. Your goal is to gather these critical elements for each item:
1.      A product photo. Customers want to see items they cannot touch and feel. Product photos should accurately reproduce the color and shape of each product.
2.      A product description. This and your product photo will make or break your sales. Too little information will drive customers to other sites where they can get the data they need.
3.      A product number. Each variation of each product should have its own product number. For example, a white, short-sleeved men’s extra large T-shirt would have one product number while an identical shirt in blue would have a different number.
4.      A price. List your normal price for each product. If one size costs more than another, explain it. For example, a half-inch dog leash costs $25. The three-quarter-inch version is $10 more.
5.      A simple, effective and easy way to order every product in any quantity. Use the electronic version of a shopping cart (have your web master create one or use one of many free versions).
6.      A shipping calculator. Have it calculate the cost based on the customer’s zip code.
7.      Ways to contact you with questions about various products, the shipping status of a specific order, return policies, etc.
Now it’s time to take a look at the writing and design of your online catalog.

Writing and Design

While much of your information will come from your suppliers, make sure your online catalog presents it in a clear, logical way. Make sure your writing is clear and uses complete sentences, not sentence fragments or phrases.
Writing your product description is critical to your success. Every product description should include key information customers will need. When referring to clothing, for example, make sure your product listing (not the description) lists every available size, color and variation.
Using multiple tabs is a common and effective method. Present a brief description or product summary on one tab, greater details on a second, customer reviews on a third, and for those products requiring it, technical specifications on a fourth tab.
The product page design should be uniform. Descriptive segments should appear in the same location on every page. For example, if you have some product photos on the middle left side of your screen and some on the right, adjust your pages so every product photo is in the same location.
A suggestion is having your webmaster create a design template. People inputting product information simply stick it in the right slot. Another method involves creating a detailed database that is run through one or more conversion programs. The conversion programs create the webpages automatically.
Your design is also a key in helping your customers find the products they want. Start with a combination of pop-out menu category lists on the left side. This helps your customer narrow their search to a given product category, such as long-sleeved work shirts. Have a summary page of smaller photos with links to each product category next to the menu. When your menu reaches the bottom level of a given category, include photos of specific products prices, brief descriptions and links to each product’s specific page.
Also make sure your website allows customers to enter specific terms and search for products that match those terms. For example, someone should be able to enter “men’s shoes size 12 DD” and come up with a list of products that match those terms. They should also be able to enter simply “women’s shoes” and be shown a much broader list of products.
By this point you should have a good general idea of what your online catalog may look like. Just writing and designing it, though, does not mean customers can find it unless they have already visited your site. That is where search engine optimization comes in.
Google's Keywords tool helps you find the right words and phrases.

Search Engine Optimization

Most online shoppers start by using a search engine such as Google, Yahoo or Bing. They enter a query and look for the most accurate match. One of your goals is to design your catalog so that each of these search engines quickly and easily records every product you sell.
Many shoppers will enter their shopping query, such as “where can I buy women’s blouses?” and only look at the top site. Others may look at any or all of the top five sites while a few look at the top 10 sites. Very few people, though, look beyond the sites listed on the first page of query results, even though there may be hundreds or thousands of matches.
Since your goal is to generate sales, it makes sense to include terms that help you achieve that goal. The technical expression used to define words and phrases that help search engines find your products is “key words.”
Key words (also called “tags”) are individual words and short phrases search engines look for when examining your site. They create a list of those words and phrases then match them to online queries. Exact word and phrase matches will generate a higher position on search engine results pages.
Your job is to include these words both in the actual text on your page, such as in the product descriptions, or in hidden text, such as the “Tags” section of Microsoft Word’s “Save As” screen.
Make sure your words and phrases are relevant to each product page. Why? Because search engines will look in the “Tags” and the product page. Tags referring to words not found on the specific web page may cause a search engine to reject the tag, lowering or eliminating your page from its rankings.
Good key words or tags about a product page advertising a specific type of work shirt, for example, could include: work shirts, long-sleeved work shirts, outdoor work shirts, stain-resistant work shirts, cotton work shirts, men’s work shirts, women’s work shirts, XYZ brand work shirts, etc. Again, it is very important to only include tags that are relevant to each specific product.
Bad key words are those completely irrelevant to the subject at hand. For example, don’t use the word “nude” as a key word unless your product has a function involving nudity. Some clothing products (e.g., women’s stockings) classify “nude” as a color, so “nude” in that situation, since it refers to an actual product feature, is accurate. Calling the handle of a sledgehammer “nude” as in “naked wood” is inaccurate, causing search engines to reject the listing.

The Google Keyword Tool

One simple, free way to check the effectiveness of your individual keywords and phrases is to run them through Google’s keyword tool.
“The Keyword Tool can help you find new relevant keywords and add them directly to your ad groups. That's important because the keywords you create for a given ad group are used to target your ads to potential customers. In other words, good keywords can help you show your ads to the customers you want, when you want. You can enter a word, a phrase, or a website address, and the tool will suggest relevant keywords for you automatically. Think of it as a keyword brainstorming session!
“Remember, though, that while the Keyword Tool can provide some great suggestions, keyword performance depends on a variety of factors. For example, your bid, budget, product, and customer behavior in your industry can all influence the success of your keywords.”
Simply type in a word or phrase, such as “hats for dogs,” select a category such as “Hobbies and Leisure” and the sub-categories “Pets and Animals” and “Pet Grooming” then click Search. Continue to try various words or phrases until you find a word or phrase where the competition is low but the Global Monthly Searches and/or the Local Monthly Searches is in an acceptable range.
Finding the right search terms is a time-consuming process but one that can be well worth the effort.
The goal is to find the right terms then use them, plus links to product pages on your website, to drive traffic and sales.
Note that while the keyword tool is free, Google’s goal is for you to pay it to use these terms as part of your advertising budget.
This database is one a used bookstore might have.
  

Your Database

Databases are collections of facts, figures and equations in searchable columns and rows that can be reordered based specific requirements.
Databases come in two main types: flat file (a spreadsheet is an example of a flat file database) and relational.
A list of products from one single supplier can be considered a flat file database. An identical list from a different supplier would be considered a second flat file database.
Relational databases are collections of flat file databases. They allow users to search multiple flat files databases based on common components. For example, be sure that every supplier’s individual spreadsheet has column headings containing the company name, product number, size, style, color, price and description. Having this commonality of design allows you to then search by each heading.
The results will also appear in a query or search window on your website, but only if the information is available to it.
For example, if you have three suppliers of men’s work shirts, you can then search through all three individual spreadsheets (which are flat file databases) and find a listing of those products that meet your specific requirements. Those requirements might be blue, short-sleeved, cotton shirts in size extra large. You or your customers can then compare shirts and find the ones they want.
So how does this database apply to your on-line catalog? Simply by helping people look through it. It allows them to type specific words (think SEO key words but this time inside your site) and go directly to pages that match those terms.
Good database also have other important functions that are critical to your business, but hidden from your customers. For example, you can—and should—have a database listing all important information about each supplier. This should include their contact name, address, phone number, email address, etc.
Your product databases should also include column headings that indicate your cost and the quantity in stock. This way you know to adjust your prices when a supplier raises or lowers theirs. You can also order hot-selling items to keep them in stock or reduce inventories to levels that meet, but don’t exceed, demand.
The critical part of database design goes back to the research phase as it applies to the information you might want at some point. Experience teaches us that it is a lot easier to add all the information you want at one time instead of adding bits and pieces here and there.

The Bottom Line

Any company selling products should have an on-line catalog that functions as both a customer information resource and as a way to generate direct sales. Allow time and manpower to gather this information and present it clearly and logically.

Friday, July 6, 2012

Build Your Own Raised Beds


Year-old redwood raised beds with drip irrigation holding calla lillies.
Did you plant some flowers and vegetables, planning to have a garden that would make the neighbors green with envy? You hit a slight snag, though: the gophers acted like a salad bar was open. You lost first one plant, then another and soon, all of them were in gophers' bellies.
Raised beds offer a simple solution to theses pesky pests. The best part is even novices can build and install a single basic raised bed in a weekend.
Building raised beds is a matter of planning and preparation, construction, installation and irrigation.
Each step is important but the first step is crucial to your success or failure.

Tools include a Skilsaw, carpenter's square, tape measure, cordless drill and
bits, screwdriver, safety goggles and ear protection
Step 1: Planning. Tools required: a tape measure, pad and pen or way to draw out and record your plan. You will also need access to a pick-up truck for hauling lumber and planting soil.
Planning begins with measuring where the raised bed will go. Be sure to allow room to insert the bed and space to accommodate a water line.
Tip: Water flows downhill. Do not have the top of your bed more than 12 inches above your water valve. Ideally, the bed should be lower in elevation.
Planning includes orienting the bed for sun exposure based on the type of plants you want to grow. It’s a lot easier to make this adjustment now than after you’ve built your bed.
Once you’ve measured where the bed will go, modify your design to reflect 8-foot wood lengths. Lumber comes in a variety of sizes, typically starting at 8 feet. Other common lengths are 10 feet, 12 feet, 16 feet and 20 feet. Eight foot boards fit in the bed of a full-size pick-up truck, while 10s and 12s stick out a bit. Anything over 12 feet can be tough to transport without a lumber rack.
Using 8 feet as a base, consider bed sizes such as 8 feet by 2 feet, 8 feet by 4 feet, 6 feet by 2 feet or 4 feet by 4 feet. Your final width may be slightly narrower, but these measurements give you a starting point.
You will also need corner posts, and for anything longer than 4-6 feet, center support posts. Use 2 by 4-inch posts when using “1 by” thick wood panels (this wood measures about .75 thick), 4 by 4-inch posts for “2 by” (1.5-inch thick) panels. Your posts should site about 6-8 inches below the bottom of your bed for stability.
Also look at how hard and level the ground is, if you are going to set your bed on it or slightly into it. The ground needs to be firm enough to support the weight of the box, dirt, plants and water on top of it. Muddy or extremely sandy soil is a bad location.
Now you have your bed’s site planned and wood lengths calculated. It’s time to move on to the Construction phase, which has three parts: cutting wood, assembling the bed and gopher-proofing it.

Step 2a: Construction. Tools required: a saw, carpenter’s square, tape measure, pencil and a flat and level surface. Safety equipment: Ear plugs or ear guards, clear goggles and gloves.
Pine posts, redwood, drill ready for pre-drilling, tape measure, gloves and
in foreground, a long clamp for warped wood. A stack of end boards sits
at left.
Start by measuring your side panels with your tape measure. Draw lines by placing your carpenter’s square along one straight edge then marking your cutting line across the board.
If you are going to make more than one cut from a single board, make your cut marks starting from one end then the other. This assures you of at least one straight, square edge.
Now that your lines are drawn, make sure your boards are flat and secure. Boards break, warp and can hurt you by bouncing back when the weight becomes uneven.
Next, put on your safety gear and start cutting. Have the blade spinning before contacting the wood.
Tip: When using power tools, always follow the manufacturer’s recommendations and never place your fingers close to a blade. Also, turn off your power saw between cuts as an additional precaution.
When you’re done cutting, pile the boards into stacks for long and short sides. Stand them on end. If one board is noticeably longer or shorter, measure it and either cut or replace it.
Your wood is ready, so it’s time to advance to the assembly stage.

Step 2b: Assembly. Tools required: a drill, Phillips head screwdriver bits, wood bits one size narrower than the screws you are using plus a manual screwdriver. Optional: long wood clamp.
Start by placing your posts on a flat, level surface. Align the top and outside of your longest top side board (if going more than one high) with the top and outside of your posts. If the top and outside of your top board is square to your posts, the bed will be square. If either side is off, the entire bed will be uneven.
Pre-drill holes for your screws. Predrilling helps reduce the amount of wood that will be split.
Your pre-drill holes should be slightly shorter and narrower than your screws. This makes driving your screws easy, but still makes the holes tight enough for the screws to hold securely.
Drive your screws in most of the way. If they stick out slightly, that’s easily fixed. Do the top board, left, middle (if longer than about 4 feet) and right.
Using the same procedure, align the second board with the top one butting up against it. If there is a gap at one end between the top board and second board, consider using a long wood clamp to force them together. Make sure your left side screws are in pace before attaching the clamp. Allow 2 or 3 screws per board per post. Once your two long sides are completed, use available materials—trees, concrete blocks, strong boxes in your garage—to support them. Now start attaching your narrow sides using a slightly different method than above.
First, align the top and outside with a long side. Pre-drill the top hole and insert your screw. Next, push, pull or tap the right long side so the top and outside of the narrow board lines up with it. Now attach the top screw. Make sure your top narrow board is square with both long sides.
With the top screws attached to both left and right sides of your narrow board, add the remaining screws to it and secure it. Now switch to the opposite end and repeat. Check to be sure the ends are square.
When all screws are in place, use a hand screwdriver to firmly tighten them. Using too much pressure will cause the wood to split.
Your basic raised bed is now complete. If gophers are not a problem or you are using it for vegetation with long roots, stick the sucker in the ground.
However, if gophers consider your plants fast food, move on to the next step.

Chicken wire installation.
Step 2c: Gopher proofing. Materials required: chicken wire, 3/8ths long staples. Tools: staple gun, wire cutters. Safety equipment: gloves, a long-sleeved shirt.
Start by turning your bed upside down.
Align one end of your roll of wire with the end and one side of your bed, allowing about 1 inch of overlap. Laying the wire over your first pair of posts, use your wire cutters to clip three sides of a hole just large enough for the post to slip through.
Use staples to attach the wire to one narrow end then lay the wire over the remaining posts. Cut those holes. Staple the far end then cut the wire. If your bed is narrower than the wire—it typically comes in 4-foot widths—trim down the long side as well. Now staple the long sides, with staples about 2-3 inches apart.
Tip: You want the wire to be tight, but not so tight it puts tension on the wood. Slightly loose is better than too tight.
While chicken wire will not keep all gophers out, it will make it more difficult for them. That's the idea: let them move somewhere else.
Congratulations. Your raised bed is now ready to be installed.

Phase 3: Installation. Tools required: bubble level, a shovel, possibly a “busting bar” for rocks and hard dirt, wheelbarrow for moving dirt.
Position the bed where you want it to go, then lightly tap the posts. This will mark the soil. Now dig holes for each post. Once the bed is touching the ground, remove or add dirt to level the bed.
If your ground is uneven, start by having your bed touch the ground at its lowest point. You will need to remove dirt from the higher area—or shift it to the lower point—to balance your bed.
Your bed is now set, but empty. If you have gopher problems, consider adding a layer of rocks atop the chicken wire. Larger rocks make it harder for gophers to get in. Fill your bed using a mixture of regular dirt and amendments such as potting soil.
I prefer to use regular dirt—so long as it is not either pure sand or solid clay—for the lower two-thirds, topped with a mix of potting soil and dirt for the top third bringing the soil mix to within the top 1-3 inches of your bed.
Tip: Liberally water your raised bed before adding your watering devices and plants. This will compact the dirt, allowing you to add more if needed.
At this point, some people add their plants and stop, preferring to water by hand or let Mother Nature do it.
If you live in an arid climate, though, irrigation is essential.

PVC 3/4-inch feed line to 1/2-inch to 1/2 inch drip tubing to 1/4 inch sprinklers.
Phase 4: Irrigation. Tools required: a pair of regular pliers and a drip irrigation hole punch. Materials: a timer that attaches to a hose bib, a female to half-inch drip connector, half-inch and quarter-inch drip tubing plus drippers and sprinklers to suit. The materials you will need depend on how many raised beds you have, their spacing and the type of plants you are using.
Start by connecting a watering timer to the nearest hose bib (outdoor faucet), then attach a garden hose to it. Next, attach the female to half-inch drip connector to the end of your hose. This device is made with black plastic and has a green ring on the end. You screw one end onto your hose then wriggle your half-inch tubing into the other, going in at least 1-2 inches for a secure fit.
For a single raised bed, run the half-inch tubing from your hose down the center of the bed to the far end. Cut it off and use a clamp (it looks a figure eight) or male hose connector (it looks like the end of a hose you screw onto the faucet but this version comes with a cap) to close it off. You can use either small rocks or special large metal staples to keep the half-inch line straight but allow a little play.
Now use your hole punch to make holes in the half-inch line and using small connectors (often supplied with spike-style drip sprinklers), connect your quarter-inch line to your half-inch. Place these drip sprinklers close to your plants then adjust their volume down or up so most of the water goes only on your plants.
It’s always a good idea to ask your local nursery or hardware store which type of drip devices to use with your plants.
Tip: Some people have problems getting the quarter-inch connectors into the half-inch tubing. Use pliers makes this task far easier.
And now it’s time for the final phase.

Three new beds join an older one (far left).
Phase 5: The End. Tools required: a cold beverage, anti-inflammatories and a cold shower or hot bath. Take a load off and congratulate yourself on a job well done.

Do some of these terms seem confusing? If so, read the accompanying story for explanations and more tips.

Carpentry Terms, Tips, Tools and Techniques for the Homeowner


Some of the terms used in the preceding guide to building raised beds may confuse you. Fear not for this brief article will help.
What follows is a list of some common terms, tips, tools and techniques to help you build raised beds. They also apply to many other home carpentry projects.
Use what you need. If you still have questions, ask a professional.

This bed uses 2-by fir attached to 4x4 posts with lag screws.

Wood

Four types of wood are often used in raised beds: redwood, pressure treated fir (or other wood), untreated fir and untreated pine. Each has its advantages and disadvantages.
Redwood can withstand direct contact with the soil and last at least 10-20 years. However, it often costs about three times more than untreated pine or fir.
Untreated pine or fir generally lasts 5-10 years, longer if sealed with a clear coat. This tends to be the least expensive material because it is frequently used in home construction.
Year-old planters are made with redwood. Pressure treated
wood is used to line a walking path, not in planting beds.
Pressure treated wood is similar to redwood in terms of both durability and cost. However, it is treated with arsenic so never use it with anything you plan to eat. Using it for flowers, or to outline a walkway is fine. But never use pressure treated wood when raising fruits or vegetables.
Wood sizes are often misleading to novices. When someone talks about a “2 by 4,” they are talking about a piece of wood in its raw, untreated size. Milling reduces these dimensions by about 25 percent, making a 2 by 4 actually 1.5 inches thick by 3.5 inches wide.
Be wary of warps and crowns. Warps will cause the wood to bow in or out. Crowns will cause it to bow up or down at one end. You can correct for a slight warp by using screws. Crowns are harder to fix.

Saws and Cutting

Wood needs to be cut to make your raised beds. Some stores and lumber yards will cut your wood at no charge. Others charge a nominal fee. If you are uncomfortable working with power saws, have the pros do it but be sure to carefully measure what you need first.
If you are going to cut the wood yourself, consider buying what’s commonly known as a Skil ® saw with a blade 5 inches or greater in diameter. These saws give you a lot of flexibility but require a steady hand and care when using.
When attaching your wood, also try to use at least one end with a square cut. This is a cut with a perfect 90-degree angle, like what you will get from a lumber yard. Some homeowners' do not cut perfectly straight, which can throw their beds off when assembled. Using square cuts on at least one edge results in a better bed.

Drills and Screwdrivers

Your typical small cordless screwdriver does not have enough power for this type of task. Either get an 18-volt or greater cordless model or a fairly powerful corded electric drill.
Since assembling the sides of your raised beds involves pre-drilling holes then inserting screws, you might find it efficient to have two drills and load one with a drill bit slightly shorter and narrower than your screws. Use the second drill for driving in the screws.

Measuring and Leveling

One of the most frequently used tools in any carpenter’s kit is a carpenter’s square. This simple device has a 12-inch metal ruler, a simple bubble and a 45-degree stop. Use this for drawing cutting lines and for perfectly positioning drill holes on wood up to
Larger squares (they look like a large metallic “L”) are better when working with bigger pieces of wood such as sheets of plywood.
Bubble levels come in a variety of lengths. A 2-3-foot bubble level is sufficient for most home construction projects. Longer levels, such as 6-footers, are only needed for major construction projects.

Screws and Hardware

You can attach the sides of your raised bed to your posts using nails, screws or lag screws.
A personal preference is avoiding the use of nails because too much force can split boards, costing you money and time.
Your typical Phillips head wood screws work just fine most of the time, provided you make sure they are wider and longer than the drill bit used to pre-drill their holes. Consider using regular screws when building raised beds with “one by” wooden sides.
Lag screws are larger and far heavier than normal screws. You will need a socket wrench to drive them. Personal preference is using lags when working with “two by” thick wood and 4-by-4-inch posts because lags have the strength to handle the additional weight.
If are going to use lag screws, pre-drill a 1-inch diameter (or smaller) hole about a half-inch deep in your side board, then pre-drill your screw hole. The larger diameter hole adds depth to screw hole and keeps the screw head flush with the outer edge of your board.
You can also use brackets but they can add a substantial cost to your project.

Safety Equipment

Power tools are not forgiving. The slightest amount of inattention can cost you a finger or worse. Splinters can fly up and destroy an eye. Boards can bounce back and clobber you. Loud noises, such as saws, can damage your hearing.
For those reasons, it’s always a good idea to wear gloves, clear plastic eye protectors and either foam earplugs or slip-on hearing protectors. Keeping a solid grip and even pressure on wood being cut will eliminate the bounce backs.

There Is No Substitute for Experience

Building raised beds is a simple project for anyone, even novices. However, pros know what to and how to do it so they are much faster and more accurate. When in doubt, talk to people and hire a pro.

Tuesday, May 1, 2012

How Much Is Love Worth?


Our dear, sweet Simba died far too young.

 Would you spend $15,000 on vet bills for a cat? I’ve spent that much twice, once on a single cat plus $12,000 and $3,000 on two others.
Many—O-kay, most—people think I’m nuts for shelling out that much money just for a cat. After all, cats aren’t people. They are only things. You can find them everywhere and anywhere. Find one and when it bugs you, dump it then get another. That is the attitude of some people. It’s not mine.
Simba, my first $15,000 kitty, was a rescue. He had an upper respiratory infection that became substantially worse when he was boarded while I went on a house hunting trip. Over time, that infection blossomed to the point where he became a full-time patient at a veterinary facility in Santa Barbara. He stayed there for the last two months of his life, returning home for less than an hour before suffering a seizure.
Despite the vet’s best efforts, Simba was diagnosed with feline infectious peritonitis (FIP), which is 100 percent fatal. Once the diagnosis was made, we had him humanely put down. Simba’s final moments were spent in the arms of my wife.
Tuxie is recovering from his ailments.
Recently, Tuxie, a black and white tomcat that was left on our property by the former owners, developed some nasty infections of his own. He spent several weeks at the Loomis Basin Veterinary Clinic near Rocklin before coming home. I would get up every four hours to feed him through a tube.
Comet, our “little red man,” has had his own problems stemming from bad teeth. Through trickery, I’ve been able to get some antibiotics into him and he also seems to be recovering. Even the vet techs say he is the worst cat they’ve ever seen in trying to get pills into him, so trickery is the only way to go.
Now you know the “what” behind my blowing through a big wad of cash, with bills I’m still paying and will be for years yet. But you don’t know the “why.”
Comet likes his undercover naps.
Why did I spend this money and devote this much time and effort to some cats?
I did it for one simple reason that is as obvious to other devoted pet owners as my big nose is to everyone else: my pets are not possessions. They are family.
Every dog and cat—including the two outdoor ferals I have yet to tame—I have is just as much a part of my family as my daughter and grandson. Would you deny your child needed medical aid because of the cost? Probably not. The late and lamented Simba and the two survivors, Tuxie and Comet, all experienced that first-hand.
This leaves me with one question for you: How much is love worth?

Saturday, March 17, 2012

Sunset at The Cliff House in San Francisco

A cigar store Indian.

The Cliff House restaurant has a fantastic oceanfront view.

The San Francisco waterfront from Aliotos.
Sunset from the Cliff House restaurant in San Francisco.

Sunset from the Cliff House restaurant in San Francisco looking at Seal Rock.

Sunset from the Cliff House restaurant in San Francisco.


The Japanese Tea Gardens in Golden Gate Park, San Francisco

The cherry blossoms are in bloom.

The Japanese Tea Gardens are full of blooming flowers right now.

A Buddha statue inside the Japanese Tea Gardens.

Statues of cranes in a koi pond.

Blossoms.

Koi.

More koi.

Part of a crane statue.


A wall of flowers.

Silver koi.