Tuesday, February 5, 2013

Have a Big Heart: Adopt A Homeless Big Dog Today

Gentle Giants rescues dogs of all large breeds.

I posted a list of 10 websites that help people rescue unwanted Chihuahuas not too long ago.
While Chihuahuas are among the tiniest of dog breeds—and also very popular, especially in urban settings where space is at a premium—some folks like their dogs a little larger.
According to Just Dog Breeds, some of the largest “giant” breeds include Mastiffs, Saint Bernards, Great Pyrenees and Great Danes.
Popular large breeds, which are smaller than the giants but still considered big pooches, are: Golden Retrievers, Alaskan Malamutes, German Shepherds, Doberman Pinschers, Rottweilers, Labrador Retrievers, English Setters and Coonhounds.
Each breed has its own distinct temperament but as with any dog, the way it is treated generally determines its disposition. I’ve know a “ferocious” Rottweiler that was more likely to lick you to death then bit you, for example.
Jasper is one of many dogs available for adoption through Homeless Hounds.
This is only a partial list of the many rescue groups specializing in large dog breeds. Your best bet is to always start with your local animal shelter. Many shelters get dogs of all sizes, genders, breeds and disposition, including paperless pure-breds. Some shelters will even contact others then call you when they have the breed you are looking for.
·  Gentle Giants Rescue is based in California and deals with all large breeds including giant breeds such as Great Danes and Mastiffs.
·  Homeless Hounds is based in Sonoma County in Northern California. It deals with dogs of all breeds, from large to small and in-between.
·  West Coast Mastiff & Large Breed Rescue saves primarily Mastiffs, Great Danes and St. Bernards plus other giant breeds.
·  Big Dawgs Rescue is located in the East Bay community of Livermore, Calif.
·  California Great Dane Rescue helps find homes for this giant breed.
·  Southern California Golden Retriever Rescue has dogs that always fostered, never kenneled and temperament tested as well.
·  The Golden Retriever Club of America National Rescue Committee has links and connections to many local breed-specific groups.
·  Rottweiler Rescue Sites Nationwide has state by state listing for this large breed, including five in California alone.
·  Gulfstream Guardian Angels Rottweiler Rescue is based in Miami and helps find forever homes for these large, loveable, loyal dogs.
·  Doberman Pinscher Rescue USA & Canada has listings of various Doberman rescue groups in North America, including by state.
·  Hand Me Down Dobes is based in Ohio and serves several surrounding states. “The Doberman is intelligent and eager to please, making a loyal and devoted pet. When young, most are energetic and playful needing consistent exercise and attention,” just like any other breed.
·  The American German Shepherd Rescue Association was created, “as a fund raising group to operate programs which protect the German Shepherd Dog from suffering due to cruelty, homelessness, ignorance, neglect and misuse. This site includes a list of rescue groups by state.
·   Central California Labrador Retriever Rescue covers California’s Central Valley from Sacramento to Merced. It has generally has young dogs and senior citizens available for immediate adoption.
·  Lab Rescue of LRCP covers the Mid Atlantic Region. Its function is finding homes for Labs.
·  Above and Beyond English Setter Rescue includes board members from across the nation, though the group is based in Lancaster, Penn.
·  Love of Breeds has listings of rescue sites for many breeds, including English Setters.
This is just a partial list of a few rescue groups dealing with large dog breeds. Five minutes of searching on-line will help point you in the direction of a breed and group where your new best friend is waiting. Have a heart and save a life: Adopt a homeless dog (or cat) today.

Tuesday, January 29, 2013

Chihuahua Rescue Sites

Chloe is a rescue and  I believe pure Chihuhua.

This is a partial list of internet sites helping find forever homes for Chihuahuas. If you are looking for a small dog, your first stop should always be your local Animal Shelter.
Many homeless dogs—including purebreds—end up at these shelters only to be told later on there is no room or budget for them. Many local shelters also keep lists of breeds people want, then call them when dogs matching your description arrive.
When local animal shelters and rescue groups do not have the pet you want, consider adopting a Chihuahua from one of these organizations. Similar sites exist for all breeds.
Lucas (front) and Tinkerbelle came from shelters. 

·  Chihuahua Rescue states it has saved more than 5,000 lives to date.
·  Chihuahua Rescue and Transport places Chihuahuas and mixes in approved homes.
·  Adopt-A-Chihuahua allows prospective pet parents to enter their search parameters, including distance.
·  Chihuahua Rescue Shelter lists groups rescuing this breed by state. It also has lists of similar groups in other countries such as the United Kingdom, Canada and Australia.
·  Famous Chihuahua focuses on dog and puppy mills nationwide, helping to find homes for the many dogs rejected by these business as being imperfect and therefore unsellable.
·  NetPets has a list of Chihuahua organizations and contacts for people in those groups, including Chihuahua Rescue and Transport.
·  New Chihuahua Connection also has a list of various rescue groups nationwide.
·  AZ Chihuahua Rescue is an Arizona-based group dedicated to providing “big hearts for little dogs.”
·  Second Chance Chihuahua Rescue is based in Nixa, Mo.
·  Ay Chihuahua is based in Central Texas that fosters Chis needing homes.
Also consider checking out the American Society for the Prevention of Cruelty to Animals (ASPCA) and American Humane Society sites regardless of breed. They can help you find shelters in your area.
This posting is brought to you as a public service of the Posh Puppy Boutique.

Thursday, January 24, 2013

Hot Wire Makes Round Pens Affordable

A basic round pen using peeler core posts, wire and a metal gate.

Horse owners will tell you that small corrals and outdoor stalls are great places for your horse to stand. Arenas are perfect for larger activities and letting horses run, jump and burn off steam. But when it comes to having an area designed to work with a horse, both are inappropriate.
Stalls are too small and arenas are too big. The solution is an area between them: a round pen.
Round pens vary in size with the most common being 60 feet in diameter. Sizes range from as small as 40 feet to as large as 120 feet. Your diameter depends on your use: smaller pens work fine if you are only going to exercise your horse with a lead rope. Larger pens are better if you plan on riding inside it.
Opinions on sizes and materials vary depending on who you talk to. Your best sources are people whose horses are of breeds, ages and temperaments similar to your own. Fond out what they like and why.
Caution: Use these prices for comparison purposes only. Prices will vary depending on your location.
Close-up of the gate and capped core posts. 

Locating Your Round Pen

 You will need to find a good spot—preferably flat and level—for your round pen. If you are going to use hot wire, you will either need to have the pen close to an outdoor electrical outlet or use direct current or solar power to energize your wire.
Also ensure that you have good footing. Ideally have 4 inches of sand atop a material such as decomposed granite and/or rock for drainage.
It is also a good idea to have your round pen near your horse’s stall so they feel safe and secure.

Common Materials—Steel Panels

The materials used in building round pens vary, partly depending on the climate with cost playing a major role for many people.
Pre-made 12-foot by 5-foot steel corral panels.
Premade steel panels are the easiest materials to work with, but also the most expensive. The advantage is you can have a round pen set-up and ready to go—excluding the gate—in less than two hours. Attaching a gate to a wooden post set in concrete may take several hours to dig plus a day or more for your concrete to cure.
Using a 60-foot diameter pen (multiple by the diameter by pi or 3.14 to get the circumference) as an example, your circumference is about 188 feet. This translates to either 180, which actually means 15 12-foot panels or 19 (190 foot circumference) 10-footers. These measurements include a gate. Premade 6-rail steel panels about 5 feet tall will often run between $90-$120 each. Gates can easily top $120 alone.
These panels use an interlocking design making them impossible for a spooked horse to go through, which can be an advantage with some horses.

Common Materials--Wood

Many people use wood as an alternative to steel both for the cost and the ability to customize their round pen to the size and shape of the available space. Each material has its advantages and disadvantages.
The most common post materials are:
·  Peeler cores: These are round, typically about 8 feet long—which means 6 feet above ground—and relatively inexpensive. Four-inch diameter cores 8 feet long made with pressure treated wood run about $9 each at Home Depot. Six-inch diameter peeler cores cost $17 each at Home Depot.
·  Redwood posts: Square redwood posts come in a variety of sizes, including 4-inch by 4-inch ($19 for a 10-foot length) and 6-by-6-inch, and lengths up to 20 feet. Redwood is hearty, durable and will not poison your horses.
·  Pressure treated fir: This material offers a less expensive alternative ($9.97 at Home Depot for 4x4x8 hemp fir) to redwood. The drawback is most pressure treatments, which are designed to prevent insect damage, use highly toxic arsenic.
Using wood also requires wood or vinyl rails, wire fencing, electrified “hot wire”—which is the focus of this article—or a combination of the above.
Electrical tape is wide and more visible than wire. This displays shows several common arrangements.
 

T-Posts And Hot Wire

Metal T-posts, named for their triangular shape, are an inexpensive alternative to wood or steel panels. You will still need at least one wood post for your gate, though.
The chief downside of using T-posts is that they can be bent easily. Using electrified wire that gives your horse—or if it gets touched, you—a jolt generally keeps that from happening.
A similar display using wire.
Assuming you want to build a 60-foot diameter round pen, and plan to install a 12-foot gate, your circumference is about 168 feet. Spacing your posts every 8 feet requires 21 posts. Spacing them every 6 feet requires 28 posts.
T-posts come in a variety of lengths. One of the most common sizes is 6 feet, which cost $5.38 each at Home Depot.
To drive in the posts you will need a sledgehammer or T-post driver, which is a heavy metal cap that goes over the top and has handles on both sides.
Hot wire comes in both wire and tape designs. Tape is wider and more visible. Wire is smaller but just as effective since both carry current.

Basic Equipment For Hot Wire

The simplest design is attaching insulators to each T-post with 3 to 6 rows of wire per post. Wires should be spaced about 1 foot apart vertically. Hot wire and tape typically comes in rolls of about 600 and 656 feet, requiring one roll for three rows, two rolls for more than three rows.
You will also need tensioners for each row to keep the wire or tape straight.
Pre-packaged gate kits contain all the essential elements you need to connect your fence to a gate.
You will also need a grounding rod regardless of your power source.

Power Sources

A solar panel power source.
There are several options for powering a hot wire fence depending both your electrical skill and the location of your pen.
If your pen is near an outdoor electrical outlet, you can purchase a power panel that will handle 2 miles of wire for about $100.
If your pen is not close to an electrical supply, your options are to use a direct current source (About $80)—some versions can use 4 “D” cell batteries or a car battery—or solar power. Solar power stations give you the most freedom of location but start at $169 to power 2 miles of fencing.

The Bottom Line

You can build a 60-foot diameter round pen for between $500-$600 using hot wire and T-posts. This figure does not include your gate nor any materials for footing, which is critical to your horse’s health.
A similar set-up using premade steel panels is about $1,500 including gate but excluding one post and footing materials.


A display of electric fencing components at a local feed store.

Tuesday, January 22, 2013

Comparing Image File Names Using Irfanview, Excel

A sample photo image directory.

Introduction

Consider this common scenario for people working on commercial website projects. You have a bunch of product photos but not photos of every product. You need to create two lists: one of the images you already have and another with other images, some of which you might not have.
This “cheat sheet” uses Irfanview ® and Microsoft Excel ® to create these lists and compare the data.

Preliminary Steps

Your first steps are gathering your information. You should have a list of image file names, possibly already in Excel. If not, duplicate the following procedure on the folder or directory where your existing images are found.
You will also want to locate the directory where the new images—including the missing shots—can be found.
If you already have a list of image file names, copy and paste the list into a column in Excel under the header “existing” and save the worksheet.

Irfanview Steps

These steps work on a folder of images where you are using Irfanview’s thumbnail function to view them.
Start by opening Irfanview and the folder where the images are found. Hit “T” to view them as thumbnails. Next hit “A” to select all images.
Now right click on the images and choose “Save selected file names as text” from the options presented.
You now have your list of file names without the associated images.

Initial Excel Steps

The Long Way
Use this method at least once so you understand how to do it.
Open Excel then, under File Open, have it open All Files and select your text file. Open the images as Fixed width and follow the Screen import wizard.
Next, see how the image file names are presented. Assuming parts of the file name are spread across multiple columns, delete every column except the final one with the actual image name. An example is saving only names such as Test1.JPG instead of C:\My_Documents\project_image_files\Test1.jpg when all of the other text is stored in additional columns.
An excel list with original file names spread across several columns.
Now you should have file names like Shoes\redmens10m.JPG and Shoes\redwomens6.JPG.
Shrink those names down so they resemble those in the list of images you already have. One way of doing this is counting the number of spaces from the right—including the period for your “dot JPG”—for your longest length name.
Now use Excel’s RIGHT Function to gather just the text characters you want to keep.
Assuming your original filename with all of the data is in column A and you want to save the first 8 characters from the right, your formula (in cell B1) will look like this:
=Right(A1,8).
Delete or modify any file names where extra characters still exist. It’s far easier to delete unneeded text than add critical information back in.
Cell B1 should just have the characters you need for comparison purposes. Copy and paste special values (Alt+ESV) to replace your formula with the actual file names and that step is finished.
Use the same procedure on your existing images if their file names are not already stored in an Excel worksheet.
Use this method when  the text you want to delete is identical with every image file name.
The Short Way
Assuming you have the same set of characters at the beginning of every file name, use search and replace (Crtl+H) to search for them and replace them with nothing. Hit Replace All and the extra characters are gone leaving just the rest of your original file name. It’s a heck of a lot quicker than the long way.

Comparing Lists

Now you’ve got a list of new file names that looks identical in format to what you already had. Do a vlookup (hit the F1 key, type in Vlookup function and read the help article if you are unfamiliar with it) between your two spreadsheets and sort the results.
Assuming your new images are stored in Column A and your old images in column B on a different worksheet, your formula should look something like:
·         =VLOOKUP(A1,'test 2.txt'!$B:$B,1,FALSE)
·         A1 is your starting cell
·         ‘test 2.txt’ is the spreadsheet where you are looking for the comparison data
·         $B:$B is the column where the data can be found
·         1 is the number of cells you are comparing
·         False indicates you want an exact match. True would give you an inexact match, which is generally avoided.
Assuming your results are in Column C, do a sort and look for the #N/A’s. An N/A indicates your worksheet of existing file names lacks that particular image. The name will appear if you already have it.
All you have to do now is harvest the images listed as N/A and you’re done.

Editor’s Note: A detailed look at using Irfanview can be found in my archives. Email me directly at davereyn83@gmail.com for a copy.

Friday, December 28, 2012

Working With IrfanView


Introduction

IrfanView is a “freeware” computer program designed to process multiple image files in large batches. While it lacks the photo editing and manipulation capabilities of programs such as Adobe’s ® PhotoShop®, it performs admirably as an assistant to those programs.

Image 1: IrfanView’s opening screen for Batch Conversions after a folder of images is selected.

When you open IrfanView for the first time, your first task is to go to the “Batch Rename settings name pattern:” and insert $N.jpg. This command ensures that every image retains its original name followed by the lowercase .jpg extension, which can save you a lot of time
Your batch options are: “Batch conversion,” which alters each image in any of several forms; “Batch rename,” which changes the file name; and “Batch conversion- rename result files,” which does both.
If all of you images are already in .jpg format, select “Batch Conversion.” If not, select “Batch conversion- rename result files.”
IrfanView retains these settings until you decide to change them.

Resizing Images

One of IrfanView’s advantages over PhotoShop ®is its ease of resizing photos. This is especially important when processing large batches of images for use in on-line product catalogs.
PhotoShop ® requires creating a macro to perform batch resizes, and then only on identically-oriented (all vertical or all horizontal) images. IrfanView lets you apply one measurement to the longest or shortest side.
IrfanView will automatically crop the borders and allow to perform many other functions on batches of images.

Image 2: IrfanView’s Advanced Options dialog box.

A suggested way of working with groups of photos is creating at least one Output folder as a nested sub-folder of the folder where your images are stored. Have your adjusted images saved to the new location. This way your originals are not overwritten should a problem occur.

Using PhotoShop and IrfanView Sequentially

Many photographers prefer to shoot their images at the maximum resolution available then “dumb down” copies for other purposes such as displaying them online. Using PhotoShop® first then IrfanView makes a lot of sense and saves a lot of time and frustration.
Consider this method, which assumes your original images come in a Raw format, which retains all of the shooting information and lets you alter the exposure after the fact.
Let’s start with a possible scenario: your firm has 50 new products it wants to sell on its website and promote in both print and online ads. You need to have three copies of each photo:
1.      Maximum quality images for print advertising. These should be 240-300 dots per inch (dpi) or greater for the best results.
2.      Smaller versions designed for the Internet that are still fairly large both for executives to pick from and for use with blogs. A size of 4 inches by 6 inches at 72 dpi (screen resolution) is a good starting point.
3.      Even smaller images for use in your online catalog, such as with a maximum size of 1200 pixels on the longest side.
First, run your images individually through PhotoShop making adjustments to the exposure, color balance, contrast, brightness and color intensity, then save the adjusted versions as .jpg images at maximum (100 percent) resolution. Keep these images in a folder separate from the Raw files just as a precaution.
Remember, jpgs compress image files, causing a reduction in information and therefore a drop in clarity every time the image size is changed. Having an unaltered original means that you can always go back to the original.
Once adjusted, these first-level images can be printed up the maximum size, such as 11-inches by 17 inches or even larger, depending on the settings and capabilities available, of the camera used.
The result of your first round is a group of jpgs, some with the lowercase .jpg extension and possibly others with upper case JPG or mixed-cased Jpg extensions. Why does it matter? Because some ecommerce platforms such as Magento will only accept images with the lowercase extension.
You just completed your first task.
Once your first round of jpgs are ready, close PhotoShop® and open Windows Explorer (not the Internet Explorer web browser). Create two nested subfolders labeled Output1 and Output 2.
Using the dialog box shown above, click the “Resize” box (Image 2, above) and select 6 then inches as the longest size and put 72 in the “Set new DPI value.”
Now go to the Basic dialog box (Image 1) and select Output1 as the “Output directory for results” folder.
In the interest of ensuring all images have the lowercase .jpg extension and the original filename, place “$n.jpg” (no quotes) in the “Batch rename” “Name Pattern” box.
Select “Add All” images from the basic choices then “Run Batch.” IrfanView will quickly process all images and place them in Output1 while leaving your original Raw and first-round jpgs alone.
Task 2 is now complete.
Now go select Output1 as your starting point and Output2 as the end point for Task 3. This time, go into the Advanced Settings Dialog Box and click the Resize Image box then select an appropriate size for your online catalog shots, such as 1200 pixels at 72 dpi.

Image 3: The JPEG/GIF “Save Options” Dialog box.
You can also reduce the file size further by dropping the image quality set in the JPEG/GIF Save Options Dialog Box from 100 percent, which is where it should be set initially. Consider a setting of about 50 percent for images that only appear online.

Now For the Results


Image 4: The T-Rex skeleton at the California Academy of Sciences, San Francisco. (Size reduced to fit space limitations) after the first pass through IrfanView. There is no noticeable drop in image quality.


Image 5: The T-Rex skeleton and a blue jellyfish at the California Academy of Sciences, San Francisco. Size reduced to fit space limitations after the second pass through IrfanView. Image quality is degraded, though this is not typically a problem with static products such as clothing.

Summary

IrfanView is not designed to replace Adobe’s PhotoShop as a photo editor. However, it is a good compliment to PhotoShop. IrfanView makes applying repetitive alterations, such as changing sizes and resolutions, a quick and easy process.


Sunday, December 2, 2012

Using a mouse is much less efficient than using keyboard shortcuts.

Introduction

Keyboard shortcuts save an immense amount of time because your fingers never leave the keys. You are not constantly clicking on a menu nor moving your mouse several times as you select from a series of drop-down menus.
These are a few of the most commonly used keyboard shortcuts in Microsoft Windows and Microsoft Office programs.
Shortcuts 
Ctrl+W: Close Windows
Alt+Tab: Switch between programs
Ctrl+Tab: Switch between tabs or windows in the same program
Crtl+C: Copy
Crtl+F: Opens the Find dialog in MS Office programs
Crtl+H: Opens the Find and Replace dialog in MS Office programs
Ctrl+N: New document
Ctrl+S: Save
Crtl+P: Print
Crtl+X: Cut
Crtl+V: Paste at cursor location
Crtl+Z: Undo one action
Alt+F+A: Save As
F1: Calls up context sensitive help
F7: Spellcheck document (Microsoft Office programs)
Shift+F7: Activates Thesaurus in Microsoft Word
F12: Save As (Microsoft Office programs)
Windows key+E: Opens Windows Explorer
Windows Key+D: Returns users to the Desktop

To save an Excel document in CSV (comma separated values) files instead of an Excel XLS (older versions of Excel) or XLSX (Excel 2010) follow these steps.
1.      Tap the F12 key to open the “Save As” dialog box
2.      Press the Tab key to go to the “Save As Type” dropdown box
3.      Press C to select the CSV option
4.      Press Enter to make your selection

Online Catalogs Require Planning, Attention to Detail


Online catalogs help drive sales.

Introduction

Having an online catalog is critical to the financial success of any sales-oriented firm, whether that firm operates on a retail “bricks and mortar” store, only an online ecommerce site, or a combination of both. Creating an online catalog requires research, writing and design, search engine optimization and a detailed database. When done properly, good online catalogs let your customers shop any time of the day or night. They also provide much more information—at a substantially lower cost—than a printed version.
On-line catalogs are costly in one major respect: they require a lot of material be manually inputted into a computer system.
Let’s take a look at each element starting with research.

Research

Researching items for an online catalog means pouring through other online resources, such as those from your suppliers, and/or printed product descriptions. Your goal is to gather these critical elements for each item:
1.      A product photo. Customers want to see items they cannot touch and feel. Product photos should accurately reproduce the color and shape of each product.
2.      A product description. This and your product photo will make or break your sales. Too little information will drive customers to other sites where they can get the data they need.
3.      A product number. Each variation of each product should have its own product number. For example, a white, short-sleeved men’s extra large T-shirt would have one product number while an identical shirt in blue would have a different number.
4.      A price. List your normal price for each product. If one size costs more than another, explain it. For example, a half-inch dog leash costs $25. The three-quarter-inch version is $10 more.
5.      A simple, effective and easy way to order every product in any quantity. Use the electronic version of a shopping cart (have your web master create one or use one of many free versions).
6.      A shipping calculator. Have it calculate the cost based on the customer’s zip code.
7.      Ways to contact you with questions about various products, the shipping status of a specific order, return policies, etc.
Now it’s time to take a look at the writing and design of your online catalog.

Writing and Design

While much of your information will come from your suppliers, make sure your online catalog presents it in a clear, logical way. Make sure your writing is clear and uses complete sentences, not sentence fragments or phrases.
Writing your product description is critical to your success. Every product description should include key information customers will need. When referring to clothing, for example, make sure your product listing (not the description) lists every available size, color and variation.
Using multiple tabs is a common and effective method. Present a brief description or product summary on one tab, greater details on a second, customer reviews on a third, and for those products requiring it, technical specifications on a fourth tab.
The product page design should be uniform. Descriptive segments should appear in the same location on every page. For example, if you have some product photos on the middle left side of your screen and some on the right, adjust your pages so every product photo is in the same location.
A suggestion is having your webmaster create a design template. People inputting product information simply stick it in the right slot. Another method involves creating a detailed database that is run through one or more conversion programs. The conversion programs create the webpages automatically.
Your design is also a key in helping your customers find the products they want. Start with a combination of pop-out menu category lists on the left side. This helps your customer narrow their search to a given product category, such as long-sleeved work shirts. Have a summary page of smaller photos with links to each product category next to the menu. When your menu reaches the bottom level of a given category, include photos of specific products prices, brief descriptions and links to each product’s specific page.
Also make sure your website allows customers to enter specific terms and search for products that match those terms. For example, someone should be able to enter “men’s shoes size 12 DD” and come up with a list of products that match those terms. They should also be able to enter simply “women’s shoes” and be shown a much broader list of products.
By this point you should have a good general idea of what your online catalog may look like. Just writing and designing it, though, does not mean customers can find it unless they have already visited your site. That is where search engine optimization comes in.
Google's Keywords tool helps you find the right words and phrases.

Search Engine Optimization

Most online shoppers start by using a search engine such as Google, Yahoo or Bing. They enter a query and look for the most accurate match. One of your goals is to design your catalog so that each of these search engines quickly and easily records every product you sell.
Many shoppers will enter their shopping query, such as “where can I buy women’s blouses?” and only look at the top site. Others may look at any or all of the top five sites while a few look at the top 10 sites. Very few people, though, look beyond the sites listed on the first page of query results, even though there may be hundreds or thousands of matches.
Since your goal is to generate sales, it makes sense to include terms that help you achieve that goal. The technical expression used to define words and phrases that help search engines find your products is “key words.”
Key words (also called “tags”) are individual words and short phrases search engines look for when examining your site. They create a list of those words and phrases then match them to online queries. Exact word and phrase matches will generate a higher position on search engine results pages.
Your job is to include these words both in the actual text on your page, such as in the product descriptions, or in hidden text, such as the “Tags” section of Microsoft Word’s “Save As” screen.
Make sure your words and phrases are relevant to each product page. Why? Because search engines will look in the “Tags” and the product page. Tags referring to words not found on the specific web page may cause a search engine to reject the tag, lowering or eliminating your page from its rankings.
Good key words or tags about a product page advertising a specific type of work shirt, for example, could include: work shirts, long-sleeved work shirts, outdoor work shirts, stain-resistant work shirts, cotton work shirts, men’s work shirts, women’s work shirts, XYZ brand work shirts, etc. Again, it is very important to only include tags that are relevant to each specific product.
Bad key words are those completely irrelevant to the subject at hand. For example, don’t use the word “nude” as a key word unless your product has a function involving nudity. Some clothing products (e.g., women’s stockings) classify “nude” as a color, so “nude” in that situation, since it refers to an actual product feature, is accurate. Calling the handle of a sledgehammer “nude” as in “naked wood” is inaccurate, causing search engines to reject the listing.

The Google Keyword Tool

One simple, free way to check the effectiveness of your individual keywords and phrases is to run them through Google’s keyword tool.
“The Keyword Tool can help you find new relevant keywords and add them directly to your ad groups. That's important because the keywords you create for a given ad group are used to target your ads to potential customers. In other words, good keywords can help you show your ads to the customers you want, when you want. You can enter a word, a phrase, or a website address, and the tool will suggest relevant keywords for you automatically. Think of it as a keyword brainstorming session!
“Remember, though, that while the Keyword Tool can provide some great suggestions, keyword performance depends on a variety of factors. For example, your bid, budget, product, and customer behavior in your industry can all influence the success of your keywords.”
Simply type in a word or phrase, such as “hats for dogs,” select a category such as “Hobbies and Leisure” and the sub-categories “Pets and Animals” and “Pet Grooming” then click Search. Continue to try various words or phrases until you find a word or phrase where the competition is low but the Global Monthly Searches and/or the Local Monthly Searches is in an acceptable range.
Finding the right search terms is a time-consuming process but one that can be well worth the effort.
The goal is to find the right terms then use them, plus links to product pages on your website, to drive traffic and sales.
Note that while the keyword tool is free, Google’s goal is for you to pay it to use these terms as part of your advertising budget.
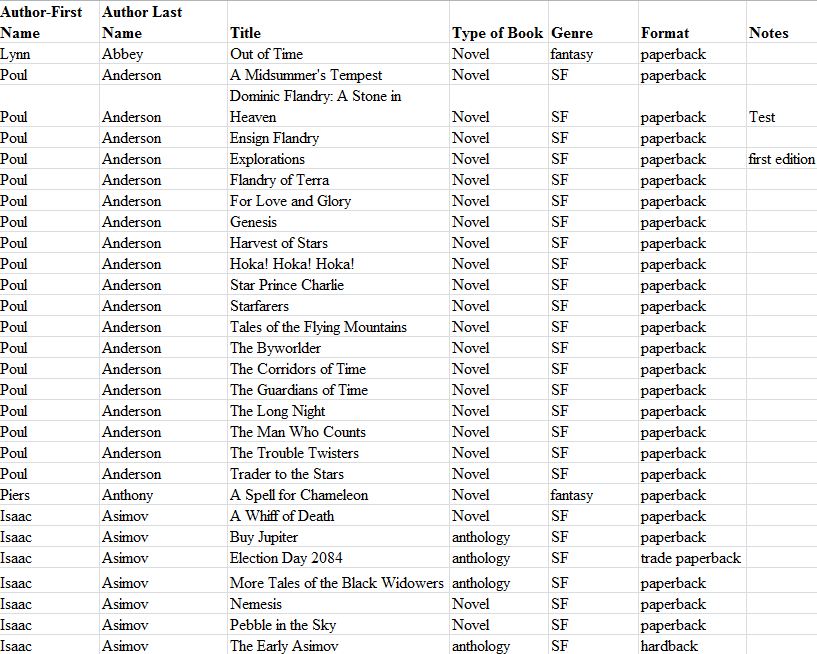
This database is one a used bookstore might have.
  

Your Database

Databases are collections of facts, figures and equations in searchable columns and rows that can be reordered based specific requirements.
Databases come in two main types: flat file (a spreadsheet is an example of a flat file database) and relational.
A list of products from one single supplier can be considered a flat file database. An identical list from a different supplier would be considered a second flat file database.
Relational databases are collections of flat file databases. They allow users to search multiple flat files databases based on common components. For example, be sure that every supplier’s individual spreadsheet has column headings containing the company name, product number, size, style, color, price and description. Having this commonality of design allows you to then search by each heading.
The results will also appear in a query or search window on your website, but only if the information is available to it.
For example, if you have three suppliers of men’s work shirts, you can then search through all three individual spreadsheets (which are flat file databases) and find a listing of those products that meet your specific requirements. Those requirements might be blue, short-sleeved, cotton shirts in size extra large. You or your customers can then compare shirts and find the ones they want.
So how does this database apply to your on-line catalog? Simply by helping people look through it. It allows them to type specific words (think SEO key words but this time inside your site) and go directly to pages that match those terms.
Good database also have other important functions that are critical to your business, but hidden from your customers. For example, you can—and should—have a database listing all important information about each supplier. This should include their contact name, address, phone number, email address, etc.
Your product databases should also include column headings that indicate your cost and the quantity in stock. This way you know to adjust your prices when a supplier raises or lowers theirs. You can also order hot-selling items to keep them in stock or reduce inventories to levels that meet, but don’t exceed, demand.
The critical part of database design goes back to the research phase as it applies to the information you might want at some point. Experience teaches us that it is a lot easier to add all the information you want at one time instead of adding bits and pieces here and there.

The Bottom Line

Any company selling products should have an on-line catalog that functions as both a customer information resource and as a way to generate direct sales. Allow time and manpower to gather this information and present it clearly and logically.